How to Rewire the Tokyo Marui M1A1 Thompson Airsoft Gun.
Please Note: Although I have used these instructions in making my own props,
I accept NO RESPONSIBILITY if you ruin your own airsoft gun or other parts
using these instructions. These techniques work for me, they might not work for you.
These instructions are worth exactly what you paid for them.
To do this modification will require tools. I suggest...
A motorized rotory tool (aka 'Dremmel.')
Wire cutters.
Soldering Iron.
Heat shrink tubing or electrical tape.
A set of metric allen wrenches.
You will also need the following item: (1) Tokyo Marui M1A1 Thompson Airsoft Gun.
You will need to READ the manual that came with your Thompson.
Part 3: Re-Wiring the Pulse Rifle
Okay, so you have your Thompson all disassembled, and you're ready to start
building your Pulse Rifle.
There are 2 different ways you can wire this gun for shooting.
There's the MIM way (aka the easy way), and the highly more complex Rook way.
I saw one of the $3,000 Monsters in Motion pulse rifles for sale on eBay. In the version I saw
they did no special rewiring of the gun AT ALL! This may or may not be common for all their rifles,
but it was that way on the one I saw.
If you look at the picture above, and you see the molex connector sticking out the bottom of the gun,
the MIM Pulse Rifle I saw used that connector as-is with no extra modifications.
While a simple solution, it doesn't leave much room for additional features, such as the locking bolt
for the stock.
The version of wiring that I use assumes one thing:
That you will not be installing a working M870 in the grenade launcher.
If you plan on mounting a working airsoft M870 Shotgun in the grenade launcher section of your Pulse Rifle,
I'll tell you now that there will not be enough space for the battery as well, unless you go
with a custom built or mini sized airsoft battery.
The grenade launcher on my pulse rifle is the resin component Spas cage from the Monsters in Motion kit. This cage has less internal space than a real steel cage however,
unlike the real steel cage, you can actually find the resin version. The interior space in the
resin version has just enough room to house a standard (aka 'Large') 8.4v 1900 mah airsoft battery.
This battery size is enough to let me shoot all day without running low on power.
On with the show...
So, you thought you could just do the wiring and be done with it, right? Ha HA! WRONG!
First you'll need to modify the upper receiver and lower receiver frame.
We'll start with the upper receiver first.
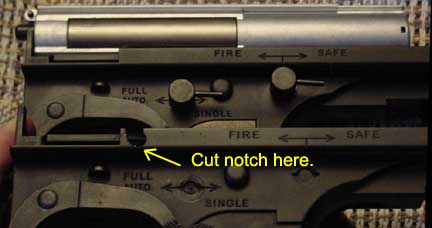
You first need to cut about 1/4 inch of metal from the left side rail.
(Left side as you look at the top of the gun.)
This notch that you cut out is the space that allows the wires to exit from the side of the
Pulse Rifle. I used the Dremmel for this but you maqy be able to do it with a simple hack saw.
Be sure to wear safety glasses, you don't want powdered aluminium in your eyes.
After cutting the notch, you're done with the upper receiver unless you'll be installing a metal stock.
In order to modify the lower receiver you need to remove the mech box. This is easier than it sounds.
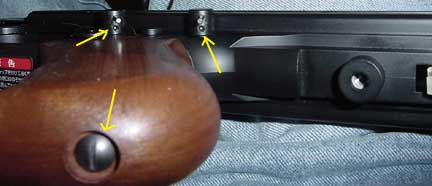
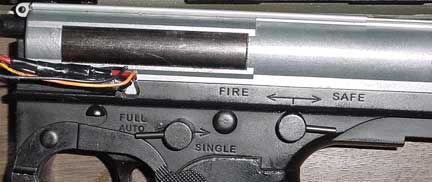
In the above image I've pointed out one bolt in the pistol grip and 2 set screws on the fire select levers.
You need to remove the pistol grip, which is easily done by removing the small bolt and pulling the plastic
grip free. Set these two items aside as you WILL need them later.
Loosen the 2 set screws in the switches. Do not remove them completely, just loosen them until you
can remove the two levers. Now CAREFULLY remove the two levers. In the bottom edge of each lever is
a very SMALL spring loaded deal that allows the selector switches to lock into place. They will
fall out! Be sure not to lose them unless you don't care if the selector switches lock in place.
Now, after the selector switches have been removed you'll see two posts with a screw in the top. Just gently unscrew
both posts and put them in a safe place (Remember our handy plastic zip lock bag? Better grab another one for
the small parts). Both posts are the same so there's no worry about putting the wrong one in the wrong hole
when you reassemble the lower receiver. The same goes for the selector switch levers as well.
Now that you have the levers and pistol grip removed, gently pull the entire mech box out of the lower receiver
and put it aside in a safe place.
Now we need to cut a channel for the wiring of the mechbox.
You need to get your rotory tool out with a small grinding bit. This is the point where I again
remind you that I assume NO RESPONSIBILITY IF YOU RUIN YOUR GUN!
Okay, now that that's out of my system, you need to use a light touch with the rotory tool
when you make this modification. If you don't remove enough plastic, you can adjust.
If you remove too much, things could get ugly and the mechbox may not seat properly in the upper receiver.
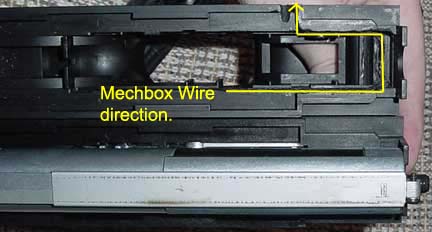
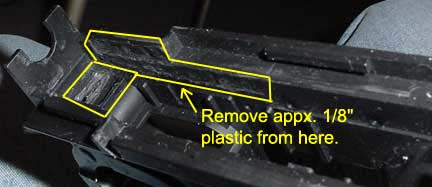
Here you see an unmodified lower frame (with mechbox) next to a modified lower frame. I've highlighted
the areas where you will be removing plastic, to allow the wiring from the right side of the mechbox to
be moved to the left side.
On the right side (as you look into the lower frame) you only need to remove a slight amount of plastic.
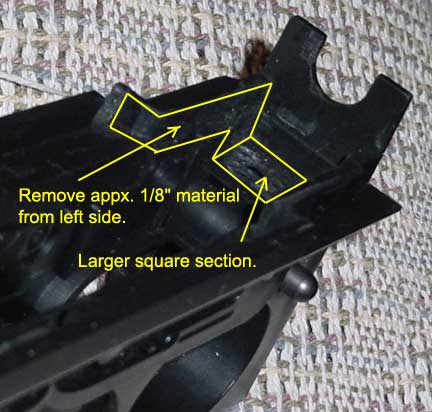
Look at the mechbox now. Under the air nozzel at the front of the mechbox is where you'll be running the wiring
from the right side of the mechbox. The "U" shaped indentation at the front of the frame is where the similarly
shaped piece of plastic on the front of the mechbox will sit. The mechbox MUST be able to sit fully into this
position or you will not be able to get the 2 halves of the gun body back togeather.
So why am I telling you this?
There's a square section that you need to cut a good size chunk out of. Don't cut so far into it that you cut
through and into the magazine channel at the front of the receiver. There's really no accurate way to measure
how much plastic to remove, it's really just trial and error. Remove plastic, try fitting the mechbox in place
with the wiring, etc.
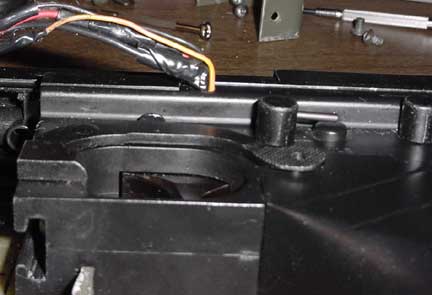
After cutting the wire channel inside the lower, you need to cut one final hole in the side for the wires
to exit from. Cut your hole behind the corner on the frame, as that corner is a reenforcing point
for the receiver.
So, now after you've hand fitted all the wire channels so your mechbox seats correctly (remember, the front
oval plastic piece must sit snugly in the oval groove at the front of the lower receiver), you're ready to
reassemble everything. Place the mechbox back in the lower, running the wires along the channels you cut in
the right side, run the wires under the front of the mechbox (under the nozzle section and the front of the
mechbox) and finally along the left side and out the notch you cut in the left side.
Now that the mech box is in place, you'll notice you have an excess of wire sticking out through the hole.
On my gun I trimmed the wire and soldered the now shortened wires togeather. You may want to place a piece
of heat shrink tubing around the wires before you solder them togeather, and then heat the tubing afterwards.
Otherwise you can use plain electrical tape to protect the wires. The tape or tubing should be placed so the
wires do not rub on the cutout notch on the lower receiver.
At this point you have yet another option you can wire in. If you have one of Hyperdyne's Pulse
Rifle shot counter/barrel flasher boards, you can wire this directly onto the motor. This technique was
created (or at least it was told to me) by Neophyl and I know it works because I did it to my personal Pulse Rifle.
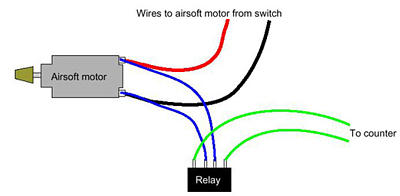
You need some thin insulated wire, a Hyperdyne Pulse Rifle Shot Counter and a reed relay switch.
The diagram shows plainly the way you need to wire the relay to the motor and the shot counter to get it to work.
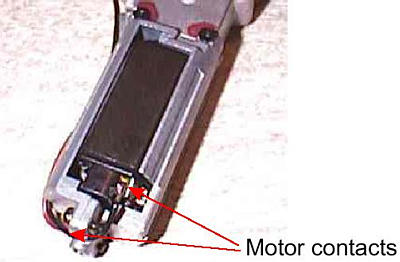
I soldered the wires that run to the motor directly to the power tabs on the motor itself. I suggest using
a thinner gauge wire so it's not broken or overly pinched by the tight interior of the Thompson
pistol grip.
The reed switch I purchased from Digikey. 1-800-344-4539
ITEM #: HE209-ND
DESCRIPTION: Relay Reed SIP SPST W/Diode 12
UNIT COST: $2.31 each
When it's all said and done, this mod causes the shot counter to count down when the airsoft gun fires.
Stop shooting, the counter stops. Fire, it starts. And it works well.
At this time you'll want to reinstall the pistol grip, which will lock the mechbox in place, and then
reattach the two selector switches, taking care to:
- A: Make sure the selector switch posts are facing the same way, and are sitting so you can actually
put the selector levers on them (The posts are keyed with one flat side so the selector switch levers will
only go on one way).
- B: Make sure your little spring loaded posts are in place in the selector switch levers before you
reinstall them.
- C: Push the Selector switch levers down far enough so the spring loaded posts 'click' into place
when the levers are moved, and then tighten the set screws.
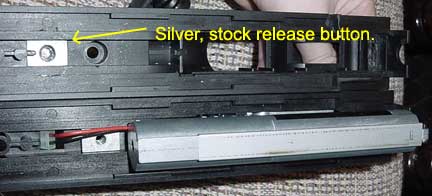
Now you're ready to reassemble the two halves of the gun, assuming you have your Locking Stock is installed.
Reinstall your spring and locking button in the rear of the upper receiver, and put the gun togeather.
You will likely need to pull the bolt back to give the mechbox a bit more space to move. You will also likely
need to pull the locking bolt up far enough so it will clear the rear of the mechbox.
The spring loaded stock locking bolt will need to rest in the recessed portion that you
drilled into the silver "T" shaped button (for more detailed information about this, check out the stock
page). As stated above, You'll need to pull the locking bolt up as far as it will go and put
both halves of the receiver togeather, again, making sure the locking bolt ends up sitting IN
the silver push button.
Also, as stated above DO NOT forget to put the receiver locking button
and spring in the upper receiver before you put it all back togeather again!
If you forget, you'll need to pull the locking bolt back up, take the works apart...
it get's annoying if you have to do this again. I've had to do so, so learn from my mistake.
And when it's all said and done, your finished assembly looks basically like this...
All images, unless specified, are Copyright
2002-2006 Rookscastle.com.