The Tutorials Section:
Pulse Rifle Barrel Vents
Last updated: July 3, 2003 2:50 PM (CST)


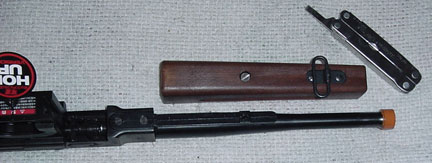
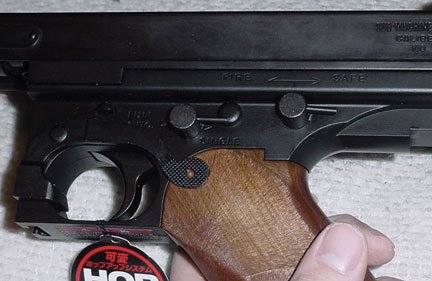
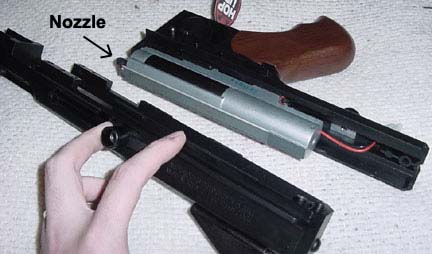
How to Disassemble the
Tokyo Marui M1A1 Thompson Airsoft Gun.


Please Note: Although I have used these instructions in making my own props,
I accept NO RESPONSIBILITY if you ruin your own airsoft gun or other parts
using these instructions. These techniques work for me, they might not work for you.
These instructions are worth exactly what you paid for them.


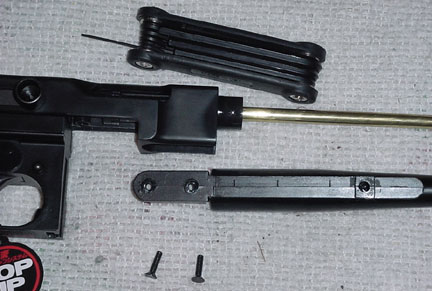
To do this modification will require tools. I suggest...

You will also need the following item: (1) Tokyo Marui M1A1 Thompson Airsoft Gun.
You will need to READ the manual that came with your Thompson.


Part 1: The Barrel


The Tokyo Marui M1 A1 Thompson airsoft gun. Image By Rook.

First, take all the necessary safety precautions. Make sure the gun is unloaded and there
is no battery installed.

 Image By Rook.

There are 3 bolts on the bottom you need to deal with. One in the center of the foregrip,
two in the metal base of the barrel. Remove the foregrip bolt first and put it aside.

 Image By Rook.

 Image By Rook.

 Image By Rook.

Next, remove the 2 barrel bolts. Do not lose these as you WILL need then again.
I recommend using the plastic zip lock sandwich bag for storage.

 Image By Rook.

Next, flip the gun over and using your metric allen wrenches, loosen the set screw
on the top of the outer barrel. Don't remove it completely, just loosen it enough
to allow you to remove the outer barrel assembly.

 Image By Rook.

And that's all you need to do to remove the barrel! See, wasn't that easy?


Part 2: The Stock and Receiver


 Image By Rook.

Now flip the Thompson over. On the bottom of the stock there are 2 bolts. Unscrew
these to loosen the stock.

 Image By Rook.

Gently seperate the stock from the receiver. In the gap you'll see the wiring harness
that runs through the stock to the (hopefully not present) battery.

 Image By Rook.

Push the little clip on the side of the molex connector to seperate the 2
wiring harnesses.

 Image By Rook.

You can put the stock aside now as you're finished with it. I suggest placing the
bolts in your ziplock bag so they don't become lost.

 Image By Rook.

Now, look at the bottom of the Thompson's receiver. At the back is a small spring
loaded locking post. In a nutshell, this is the piece that holds the whole gun togeather.

 Image By Rook.

You should have the gun on safety. I'm not sure if it's required on the Airsoft gun
like it is on a real Thompson, but it can't hurt.

 Image By Rook.

When re-assembling the Thompson you need to pull back the "bolt" to allow enough
clearance to get the two halves of the gun back togeather. When disassembling, I've
sometimes needed to pull the "bolt" back, sometimes not.

 Image By Rook.

Using a small screwdriver (or even a small allen wrench), push in the locking button
as far as you can, and try to pull the lower receiver back over the button.

 Image By Rook.

 Image By Rook.

The receiver will move about 1 inch where it will get to the point where you
can seperate the 2 halves of the receiver.

 Image By Rook.

 Image By Rook.

Be careful when seperating the two halves of the receiver so you don't accidentally
damage the air nozzle of the mechbox.

 Image By Rook.

 Image By Rook.

Now that it's apart, you should put the locking button and spring in your ziplock bag
so they don't get lost. You WILL need these 2 parts to reassemble the gun.

 Image By Rook.

And that's it! You're done... for the moment.


Back to the Tutorials Main Page.
Tutorial: How to install disassemble your M1A1 Thompson Airsoft Gun. Tutorial: How to rewire or modify the wiring on  your M1A1 Thompson Airsoft Gun.
Tutorial: How to install a metal barrel on your M41 Pulse Rifle. Tutorial: How to install a metal stock on your M41 Pulse Rifle.
Tutorial: How to build an M41 Pulse Rifle. COMING SOON!!
All images, unless specified, are Copyright 2002-2006 Rookscastle.com.