The Tutorials Section
Last updated: September 10, 2004 3:55 PM (CST)


How to Install Metal Accessories
on the Pulse Rifle.


These instructions can of course be modified to work with Thompson SMG parts
other than those made by Tokyo Marui, however, this tutorial is aimed
at those who are specifically making a firing airsoft Pulse Rifle.

Although I have used these instructions in making my own props, I accept
NO RESPONSIBILITY and NO LIABILITY if you ruin your own airsoft gun
or other parts using these instructions. They worked for me, they might not
work for you. These instructions are worth exactly what you paid for them.


To do this modification will require tools. I suggest...
Again, I assume no responsibility or liability if you break your gun attempting to follow this tutorial!


Part 6: The Metal 'Finish' Parts


So, you have your whole Pulse rifle built... but somethings missing...

Well, here we go again...


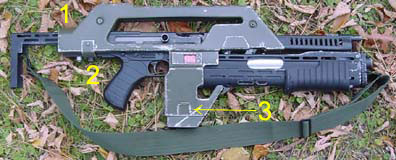
My rifle was missing a few detail points that are present on the 'real' ones
used in the film. They are...

  1. Rear top 'cap'
  2. Rear bottom 'cap'
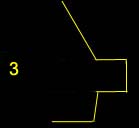
  3. Mag tabs
Screen used BAPTY Pulse Rifle... Photo supplied by Aliens Legacy Member. Thank you!
Screen used Rifle...

My PR, before mods began...
Mine...

Now I had a resin bottom plate on mine, but it just didn't seem secure. Add the fact that
the bolts 'holding' the plate in place were just screwed into the resin of the shroud and
I've lost one of them already. It was time to 'fix' these nagging issues I had with the rifle.


Metal Mag well tabs...

First, I went to my local Ace Hardware and bought a strip of Aluminium (sic?) plate. It was about
a meter in length, about 1" wide and cost me less than $5.00. The stuff I bought the first time
was VERY, VERY Thick. And when bending it it proved to be too thick.

I believe the stuff I bought the second time was about 1/16 inch thick, perhaps about 2-2.5mm?
When it's in the long length, it's pretty floppy, but when bent correctly it's quite strong.


I had a couple resin mag tabs on hand, so I just used that as a template to make the AL ones.
All I did was cut it to length (just under an inch long) with a hacksaw, and then used a file
to round off two of the corners, leaving the bottom edge square. I then used the hacksaw to cut
four narrow grooves at the top end, leaving a blank space at the bottom. When I had two of these
made (it took all of 10 minutes from start to finish) I then used a centerpunch (aka: a pointy iron nail)
and made two marks, drilled two small holes and fitted 2 small pop rivits in there.

Please, please, please, PLEASE do NOT hold the metal pieces in your hand as you drill
the holes. If you don't own a drill press, hold the pieces with a pair of vice grips or
lock it in a vice. If the drill grabs the metal and spins it, you WILL bleed. Just
a little friendly advice.

I also used a fine grit sandpaper to rough up the surface of the mag tabs, and then painted them a
flat black. It's easier to sand/paint before you rivit them to the shroud. ^_^

Now if you're using a thick resin cast shroud, you may want to use small screws instead of rivits.
You can probably get away with using rivits with a thin cast resin shroud (like the GEM one),
a vaccuform shroud (Like the GWII or Mattsuo style) or if you're really lucky (or rich) a
metal shroud.

The original shrouds made by BAPTY (The company who made the weapons for Aliens) were hand hammered
AL, and parts were rivited directly to the shroud. With a thin resin or Vaccuform shroud you need to
add washers to the inside, otherwise the rivits will just pull through the material when you tighten
them down.


On this side I got the drill holes a little too close togeather, so I had to use a dremmel to notch
the right hand washer so it would lay flat. For the other side I laid the two washers down first,
and made my marks for drilling. hey, it's a learning process... learn from my mistakes!


Mag well guides...

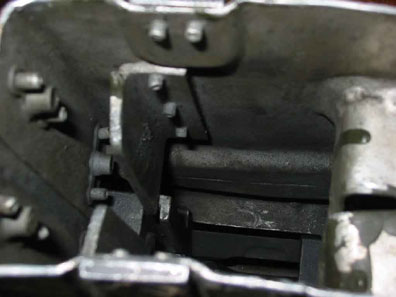
Now there's the magazine guides. What an irritating thing to get done! If you're one of the lucky
ones who own the original MIM shroud, you can skip right over this section because the MIM shroud
has guides built in! Now THAT's a great idea! No fumbling about in the middle of battle trying to get
a mag into your gun! Now those of us with resin or Vaccuform shrouds need to do a little more work.

The BAPTY rifles had the same problem as our hobby rifles do. The mag well area was HUGE and without
specially constructed guides, there was NO way mag insertion was going to be easy.

BAPTY image shared by a member of the Alien Legacy board!


The BAPTY guides were about 3" in length, and were locked in place with 3 rivits. I made mine
a bit shorter only because I didn't feel like trying to put a 90 degree bend in a 3" piece of metal.
Well, that and the fact the AL I was using would have been too narrow if bent lengthwise. I suppose
I could add another piece... but I'm not feeling that ambitious. Plus, every time I add a rivit, I
break off more of my paint job due to the compression. Grrr...

You also want to cut one of the corners off before you bend the metal. This corner cut functions
like a funnel, forcing the magazine right where you want it to go. I suppose you could even take
a couple small blocks of wood, and notch them out to provide the same function as seen in the MIM
shrouds, but I just went with the metal guides because that's what were used on the movie guns.
That, and I don't have any woodworking tools. ^_^

Yes, I admit that I FUBARed one of the mag tabs. I drilled the holes, rivited it in place and then decided to recheck my pics of the real deal. Doh! Had it upside down! Well, it's fixed now.


One major issue with my shroud is the fact it's made from resin, and has varying degrees of thickness.
There's also metal inserts in the sides of the shroud so drilling accurate holes is at times difficult.
A vaccuform shroud shouldn't have these issues. What I did was put a mag into the gun, then align the
guides. There's a LOT of trial and error and custom fitting to make sure you have enough clearance so
the magazine will enter freely, but not too much clearance so the guides don't do their job.

I can't stress this enough: make triple sure to test your guide placement before you drill
into your shroud. I thought I had mine placed perfectly, and after drilling holes on one side
I realized that the metal reenforcing bar embedded in the side of the shroud actually was higher
than the rest of the shroud, causing the guide bracket to slide 1/8 inch too far out. Imagine how
suprised I was when I did a test fit after riviting the bracket in place and the mag wouldn't
even go into the mag well at all! Thankfully I only used one rivit rather than both of them, so
repairs were minimal.

After you get the guides and mag tabs in place, you may find that the rivits from the mag tabs
stick up too far and slightly hamper mag insertion. At this point you can use your dremmel or
hand file to shave those edges down a little. Work on it a little at a time. Remember, you can
always remove more material, but you can't easily add more. You also don't want to remove so
much that your rivits cease to function. Again, this may be less of a problem with a metal or
vaccuform shroud than it is with a resin cast one.


The metal back brackets...

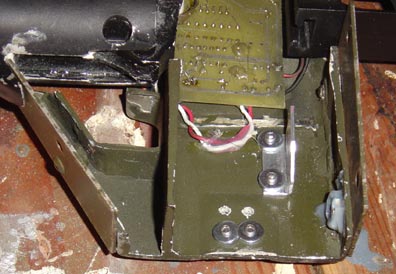
I never installed the resin top bracket from my MIM kit, and the resin bottom bracket fit around
the stock mounting base (from the wooden M1A1 stock), which wasn't accurate to the BAPTY rifle.
I decided after seeing what others were doing lately, that I'd try making one of the multi-bend
bottom brackets. It's hard, but NOT impossible to do yourself.


The only tools I used for this section were a couple of drill bits, a bench mounted vice and a couple
hammers.

Basically, I just used a fabric tape measure to measure all the compound angles. The total length
of the metal I would need was xxx (I need to remeasure it, I think it was just over 7") in length.


Notice that the sides are slightly angled! This is because there are additional angles from the sides
of the Thompson and the shroud. Ideally what the angle does is bypass all that stuff. ^_^

What I did first after cutting the correct length of metal was measure where my pre-existing
bolt holes were on my shroud. Measure on the metal and center punch the location for future drilling.
Then I measured where each of the bends should be on the shroud, and scribed those locations on the metal.
What you end up with is a flat piece of metal with six lines marked on it. I then center punched the
middle section and drilled a hole. This will be the very bottom section and will anchor the whole works
to the Thompson.


Now comes the fun part. I spent a great deal of time (a whole 5 minutes!) trying to decide how to bend
this beast. Using only a bench vice and a hammer. I know there's custom tools designed for just bending metal,
but I don't even own a band saw, so we have to do it the old fashioned way... brute force!

I started by bending the bottom two bends first. Since the metal is reasonably thin, you should be
able to make the second bend by hand at least partially.


You may choose to just do one side at a time as well. The initial bend (first half of part 1) is so
narrow that it's hard to get at when you go to make the second bend. On my vice, the shaft that sticks
out on the bottom when the vice is completely closed was the right thickness to help with this bend.
If you don't have a vice, try using a pair of pliers or vice grips to assist in making this bend.
To make the remaining angles, I just clamped one end of the metal in the vice at the correct position
that you scored earlier in the metal.

Good luck with your projects!

Rook


Back to the Tutorials Main Page.
Tutorial: How to install disassemble your M1A1 Thompson Airsoft Gun. Tutorial: How to rewire or modify the wiring on  your M1A1 Thompson Airsoft Gun.
Tutorial: How to install a metal barrel on your M41 Pulse Rifle. Tutorial: How to install a metal stock on your M41 Pulse Rifle.
Tutorial: How to build an M41 Pulse Rifle. COMING SOON!!
All images, unless specified, are Copyright 2002-2006 Rookscastle.com.